
Smooth seams.
Making smooth seams is esentially for constructing a sturdy kite.
When the seam is not straight the tension will not be devided equally
and it will tear at the points where the seam gets out of line.
I use a simple technique to make all my seams the same width: this has a big advantage; If you always have the same allowance you can work fast and you don't have to make two templates (one with and one
without the allowance).
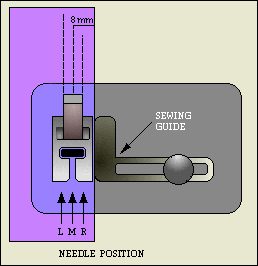
What you need is a zig-zag machine and a little attachment called a sewing guide:
It's a L shaped piece of metal with a slot in the long leg of the L.
It comes with most machines.
The idea is to screw it on your sewing plate (that's what the threaded
holes are for ) with the short leg against the walking foot.
Now take a piece of paper, and sew some stiches with the needle to the
left right and middle while you guide the paper alongside the sewing guide.
For me the right position gives a 5 mm seam allowance and the middle
8mm. Chose your favorite (mine's 8) and make it your standard seam allowance.
The reason I chose 8 mm for my standard is that I use 1" ripstop ribbon on all my seams.
It's folded three times so I need 25 mm ( 1' ) ribbon to do that. The result is a 8 mm black striping in between colored panels: it adds to the strenght of the kite and it makes the colors look brighter: a sort of stained glass effect.
It looks rather complicated, but if you try it you'll see that it works real fast and neat.
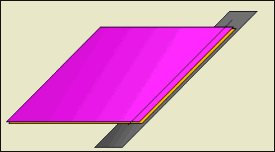
You start off with the ribbon underneath the two panels and you sew the batch together with a 8 mm seam allowance. If the seams are difficult ( like a curved to straight panel ) I first sew the panels together with a 5 mm seam allowance: that is the needle to the right position.
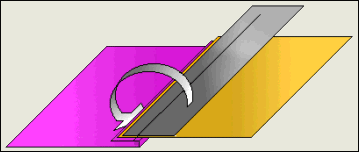
The next step is to fold the panels open and fold the black ribbon in between the double purple layer. Now you can finish it off with a straight (or zig/zag if you insist) stitch over the black ribbon.
the result is a perfect closed seam.
For leading or trailing edges you can follow the same procedure: the only difference is that the yellow layer isn't there. This way you end up with a sturdy 4 layer edge that doesn't need any additional reinforcing.
 Back to the index